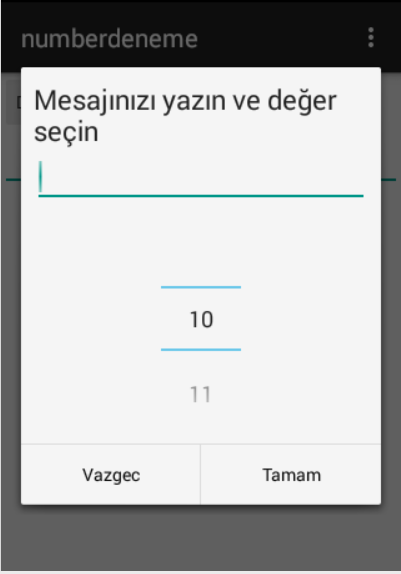
Çok çeşitli dialog pencereleri oluşturulabilmektedir. Çeşitli örneklerden gördüklerimden yeniden derlediğim şekliyle en kolay yolu;

- Diolog penceresi için yeni bir layout oluşturun:
promts.xml
<?xml version="1.0" encoding="utf-8"?>
<LinearLayout xmlns:android="http://schemas.android.com/apk/res/android"
    android:id="@+id/layout_root"
    android:layout_width="fill_parent"
    android:layout_height="fill_parent"
    android:orientation="vertical"
    android:padding="10dp" >

    <TextView
        android:id="@+id/textView"
        android:layout_width="wrap_content"
        android:layout_height="wrap_content"
        android:text="Mesajınızı yazın ve değer seçin"
        android:textAppearance="?android:attr/textAppearanceLarge" />

    <EditText
        android:id="@+id/userInput"
        android:layout_width="match_parent"
        android:inputType="text"
        android:layout_height="wrap_content" >

        <requestFocus />

    </EditText>
    <NumberPicker
        android:id="@+id/sayi11"
        android:layout_width="wrap_content"
        android:layout_height="wrap_content"
        android:layout_gravity="center" />

</LinearLayout>
- Sonra activity_main.xml ana layoutumuzu oluşturulım:
<?xml version="1.0" encoding="utf-8"?>
<LinearLayout xmlns:android="http://schemas.android.com/apk/res/android"
    android:layout_width="fill_parent"
    android:layout_height="fill_parent"
    android:orientation="vertical" >

    <Button
        android:id="@+id/button"
        android:layout_width="wrap_content"
        android:layout_height="wrap_content"
        android:text="Deger Şec" />

    <EditText
        android:id="@+id/editTextResult"
        android:layout_width="match_parent"
        android:inputType="text"
        android:layout_height="wrap_content" >

    </EditText>

</LinearLayout>
- Şimdi kodumuzu yazalım:
MainActivity.java
package com.example.okul.numberdeneme;

import android.app.AlertDialog;
import android.content.Context;
import android.content.DialogInterface;
import android.support.v7.app.ActionBarActivity;
import android.os.Bundle;
import android.view.LayoutInflater;
import android.view.Menu;
import android.view.MenuItem;
import android.view.View;
import android.widget.Button;
import android.widget.EditText;
import android.widget.NumberPicker;


public class MainActivity extends ActionBarActivity {
    private Button button;
    private EditText editTextMainScreen;
    final Context context = this;

    @Override
    protected void onCreate(Bundle savedInstanceState) {
        super.onCreate(savedInstanceState);
        setContentView(R.layout.activity_main);
        button = (Button) findViewById(R.id.button);
        editTextMainScreen = (EditText) findViewById(R.id.editTextResult);
        button.setOnClickListener(new View.OnClickListener() {
            @Override
            public void onClick(View v) {
                LayoutInflater layoutInflater = LayoutInflater.from(context);
                View promptView = layoutInflater.inflate(R.layout.prompts, null);
                AlertDialog.Builder alertDialogBuilder = new AlertDialog.Builder(context);
                alertDialogBuilder.setView(promptView);

                final EditText input = (EditText) promptView.findViewById(R.id.userInput);
                final NumberPicker np;
                np = (NumberPicker) promptView.findViewById(R.id.sayi11);
                np.setMinValue(10);
                np.setMaxValue(40);
                np.setWrapSelectorWheel(false);
                  // Dialog penceresi ayarları
                alertDialogBuilder
                        .setCancelable(false)
                        .setPositiveButton("Tamam", new DialogInterface.OnClickListener() {
                            public void onClick(DialogInterface dialog, int id) {
                                // kulllanıcının girdiği değerlerin ana layouta aktarılması
                                editTextMainScreen.setText(input.getText());
                                button.setText(Integer.toString(np.getValue()));
                            }
                        })
                        .setNegativeButton("Vazgec",
                                new DialogInterface.OnClickListener() {
                                    public void onClick(DialogInterface dialog,    int id) {
                                        dialog.cancel();
                                    }
                                });

                // alert dialog oluşturma
                AlertDialog alertD = alertDialogBuilder.create();
                alertD.show();

            }
        });
    }

    @Override
    public boolean onCreateOptionsMenu(Menu menu) {
        // Inflate the menu; this adds items to the action bar if it is present.
        getMenuInflater().inflate(R.menu.menu_main, menu);
        return true;
    }

    @Override
    public boolean onOptionsItemSelected(MenuItem item) {
        int id = item.getItemId();
        if (id == R.id.action_settings) {
            return true;
        }

        return super.onOptionsItemSelected(item);
    }
}
Bu örnekte diğer form nesnelerini de kullanılabilir. Nette çok örnek var ama bu kadar az ve öz olanı yok....
Hiç yorum yok :
Yorum Gönder